
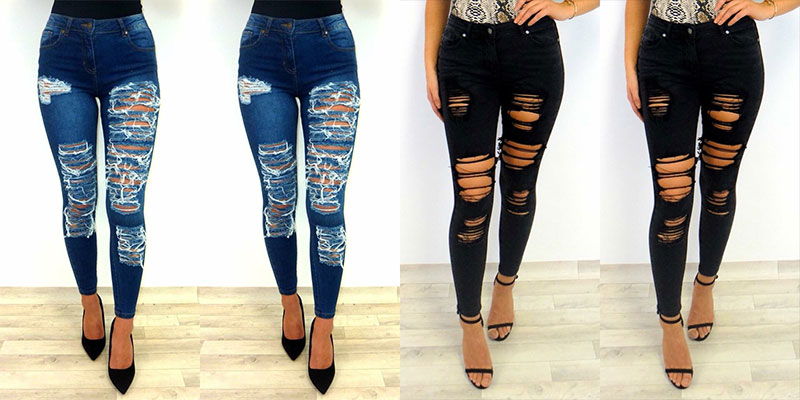
Save Cash and Make Your Own Trendy Ripped Jeans

Distressed denim — or jeans with seemingly random rips, tears, and worn patches — are a trendy wardrobe item that can be easily dressed up or down. If you love the look of ripped jeans, but don’t want to spend big money on a designer pair, I’ve got your step-by-step guide to making your own distressed denim, whether you start with skinny jeans, relaxed boyfriends, or any other favorite style. Simply follow my easy tutorial to create designer-look ripped jeans in 5 easy steps, using any pair of jeans that are already in your closet.
What You’ll Need:
- Pair of jeans you want to distress
- Safety pins
- Coarse sandpaper block
- Scissors
- Needle and thread
- Washing machine
For this tutorial, I decided to make ripped jeans with tears at the knees, plus a few frayed spots on the thighs. Read on to learn how to transform your plain jeans into trendy distressed denim.
Choose the Jeans You Want to Distress
Before you get started distressing, you’ll need to choose a pair of jeans to be your victim. This tutorial works with any jean you’ve got in your closet, so go ahead and pick whatever pair you like. Are skinny jeans your thing, or do you prefer boyfriend styles? Dark indigo, faded vintage or white denim? I do suggest trying this tutorial with a pair of jeans you don’t wear much anymore, for the first time around.
You could even pick up a cheap, pre-loved pair at your local thrift store to experiment on. Just don’t attack your expensive designer jeans that you love with scissors and sandpaper until you’ve really got the hang of at-home distressing.
Mark the Spots You Want to Distress

Now it’s time to mark the spots you’ll be distressing, using safety pins. To do this, put on your jeans and stand in front of a full-length mirror.
Place a safety pin:
- On either side of each knee (4 safety pins)
- Wherever you’d like to create a worn-out spot
Next, take off your jeans and get ready to start creating worn-looking patches, in the next step.
Create Worn Patches

I used a coarse sandpaper block to create natural-looking, abraded spots on the thighs of my jeans. You can also use a cheese grater from the kitchen if you have one handy, but I personally like the block for the control it gives you over the end result. Simply rub lighter or harder on any area of the denim material you’ve marked off, depending on the degree of wear that you want to create, using the corners and sides of the block to roughen the material and reveal the white threads below.
(Remove safety pins before beginning — it’s there merely to help you remember where you want to create the distressing, once your jeans are off).
Use caution when sanding, working gradually and experimenting with the corners and flat sides of the block, to create the desired distressed effect on jeans.
Tip: If you find you’re grating away without enough ripping happening, you can help jeans along by using your scissors to create tiny horizontal cuts in the area you want to distress, and then working over that area with your sandpaper block.
When you’re happy with the distressed patches, let’s move on to making rips in the knees of your jeans.
DIY Ripped Knees in Jeans

Before you begin this step, a word of advice: Knee holes in jeans will only get bigger over time, with wear and care. That’s why it’s best, to begin with lightly ripped knees and take a few extra steps to keep the hole from growing bigger or sagging, which I’ll show you how to do.
Begin by using your scissors to cut a small horizontal snip (no more than half-an-inch wide) in the center of the knee, right in-between the safety pins you used to mark the area.
Now pick up your coarse sandpaper block and scrape it across the knee area of jeans, pulling outward from the cut. You’ll see how the fabric roughens and tears as you work, revealing white threads below. Again, work slowly with your sandpaper, gradually increasing the size and shape of the torn area until it looks done to you.
When you’re happy with the knee holes, take a minute to make sure they don’t grow too much bigger. Read how to do that in the next step.
Prevent Knee Holes in Jeans from Growing

Turn jeans inside out and make a few quick stitches around the edges of the knee holes from the inside, to reinforce the sides of the rips. This will prevent the holes from growing, which over time can give your denim a saggy look. When you think you’re finished stitching, give the fabric a sideways tug, to confirm the sides of rips are well-secured.
With that accomplished, you’re ready for the final step in ripping your jeans.
Machine Wash Jeans

With jeans still turned inside-out, toss them in the washing machine on a normal water cycle. Use the hot water setting if you want to add to your jeans’ worn-in look. (To protect dark wash denim from fading, you’ll use the cold water setting). You can either toss jeans into the dryer afterward or hang them to dry. A turn through the washer (and dryer) will help to loosen the material around your DIY distressing, for a natural, perfectly frayed look.
Learn how to launder jeans to keep them looking great, in our ultimate guide to washing your jeans.
- About the Author
- Latest Posts

I’m Iskra Banović, editor of Blufashion and the voice behind its fashion, beauty, and lifestyle stories. Fashion, beauty, and lifestyle are my playground, but I’m just as likely to share the messy side of it all, like the time I tested a “must-have” skincare gadget and ended up with glitter stuck in my hair. I love turning trends and everyday finds into something useful (and fun) for real people.


2 Comments
It’s fantastic that you are getting ideas from this post as well
as from our discussion made at this place.
i love it….:) 🙂